Nous allons suivre ces quelques actions pour installer un serveur permettant de développer un chat avec Node.js, Express, Nodemon et Socket.io.
Commençons
npm init
PS C:\Users\mm\Documents\tdb\workspace\socket> mkdir chat


    Répertoire : C:\Users\mm\Documents\tdb\workspace\socket


Mode                LastWriteTime         Length Name
----                -------------         ------ ----
d-----       25/06/2018     21:55                chat


PS C:\Users\mm\Documents\tdb\workspace\socket> cd .\chat\
PS C:\Users\mm\Documents\tdb\workspace\socket\chat> npm init
This utility will walk you through creating a package.json file.
It only covers the most common items, and tries to guess sensible defaults.

See `npm help json` for definitive documentation on these fields
and exactly what they do.

Use `npm install <pkg>` afterwards to install a package and
save it as a dependency in the package.json file.

Press ^C at any time to quit.
package name: (chat)
version: (1.0.0)
description: My first chat with node.js, Express, Nodemon and socket.io
entry point: (index.js)
test command:
git repository:
keywords: Socket nodejs Express
author: trstndbrtl
license: (ISC)
About to write to C:\Users\mm\Documents\tdb\workspace\socket\chat\package.json:

{
  "name": "chat",
  "version": "1.0.0",
  "description": "My first chat with node.js, Express, Nodemon and socket.io",
  "main": "index.js",
  "scripts": {
    "test": "echo \"Error: no test specified\" && exit 1"
  },
  "keywords": [
    "Socket",
    "nodejs",
    "Express"
  ],
  "author": "trstndbrtl",
  "license": "ISC"
}


Is this ok? (yes)
Je crée mon dossier de travail avec un mkdir chat. Puis, je me place a l'interieur avec un cd chat et j'initialise mon projet en créant mon package.json avec un npm init.
Pour la création du fichier pachage.json, Il n'y a qu'a suivre la procédure.
Le fichier package.json
/package.json
{
  "name": "chat",
  "version": "1.0.0",
  "description": "My first chat with node.js, Express, Nodemon and socket.io",
  "main": "index.js",
  "scripts": {
    "test": "echo \"Error: no test specified\" && exit 1"
  },
  "keywords": [
    "Socket",
    "Nodejs",
    "Express"
  ],
  "author": "trstndbrtl",
  "license": "ISC"
}
Installons Express, Nodemon et Socket.io
Une fois le fichier package.json créé, poursuivons en ligne de commande en installant les dépendances de notre projet, càd, Express, Nodemon et Socket.io.
npm i --save express nodemon socket.io
Babel, outils de developpement
Puis installons les outils de développement.
npm i --save-dev babel-cli babel-preset-env babel-preset-stage-0
La version babel-stage-0 recouvre toutes les versions de javascript.
Compiler notre javascript
Revenons a notre package.json et constatons son évolution.
Profitons-en pour ajouter une ligne de commande à la section scripts pour nous assurer, au démarrage du serveur, l'appel au fichier qui s'occupera de la conversion d'ECS6.
{
  "...."
  "scripts": {
    // Au demarrage du serveur, assure toi d'executer le script de conversion babel-node js
    "start": "nodemon ./index.js --exec babel-node -e js",
    "test": "echo \"Error: no test specified\" && exit 1"
  },
  "...."
}
Le fichier .json au final
Au final notre fichier package.json ressemble a ceci.
{
  "name": "chat",
  "version": "1.0.0",
  "description": "My first chat with node.js, Express, Nodemon and socket.io",
  "main": "index.js",
  "scripts": {
    "start": "nodemon ./index.js --exec babel-node -e js",
    "test": "echo \"Error: no test specified\" && exit 1"
  },
  "keywords": [
    "Socket",
    "Nodejs",
    "Express"
  ],
  "author": "trstndbrtl",
  "license": "ISC",
  "dependencies": {
    "express": "^4.16.3",
    "nodemon": "^1.17.5",
    "socket.io": "^2.1.1"
  },
  "devDependencies": {
    "babel-cli": "^6.26.0",
    "babel-preset-env": "^1.7.0",
    "babel-preset-stage-0": "^6.24.1"
  }
}
Enfin, créons notre script babel .babelrc à la racine du projet qui s'occupera de la conversion du code.
/.babelrc
{
   "presets": [
       "env",
       "stage-0"
   ]
}
Index.js
Il nous manque notre point d'entré, l'index.js
/index.js
// Création de notre application
const app = require('express')();
// Création du serveur
const server = require('http').Server(app);
// Notre librarie socket
const io = require('socket.io')(server);
// Settons le port 3000
const port = 3000;

// Nous démarrons note serveur
server.listen(port, () => {
    console.log(`Le serveur tourne sur le port ${port}`);
});
// On appel notre page index
app.get('/', (req, res) => {
    res.sendFile(__dirname + '/public/index.html');
});
// A la connection d'un utilisateur, débutons une conversation.
io.on('connection', (socket) => {
    console.log('Un utilisateur est connecté');
    socket.emit('message', { mathilde: 'Hello, salut Tristan !'});
    socket.on('reponse', (data) => {
        console.log(data);
    })
})
Index.html
et et notre vue, l'index.html.
/index.html
<!DOCTYPE html>
<html lang="en">

<head>
  <title></title>
  <meta charset="UTF-8">
  <meta name="viewport" content="width=device-width, initial-scale=1">
</head>

<body>
  <script src="/socket.io/socket.io.js"></script>
  <script>
    const socket = io.connect('http://localhost:3000');
    socket.on('message', (data) => {
      console.log(data);
      socket.emit('reponse', { tristan: 'He, salut Mathilde !!!' });
    })
  </script>
</body>

</html>
Notre projet
/node_modules
- - all vendor
/public
- - index.html
.balarc
index.js
package.json
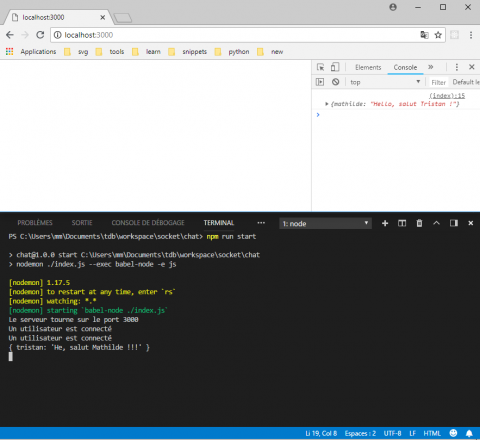
Lançons le server
npm run start
et ouvrons le navigateur à l'url http://localhost:3000/.